

Using Custom Unreal Engine Materials#
Use custom Unreal Engine materials when you need Unreal-specific rendering behavior for 3D data. In general, appearanceURI = urn:X-l3d:material:<MaterialId> references a MaterialAPI material. Unreal also supports an Unreal-only form where the appearanceURI value contains a Custom Material URN: appearanceURI = urn:X-l3d:material:<CustomMaterialURN>.
For example, in appearanceURI = urn:X-l3d:material:urn:my-namespace:brushed-metal, the full value is the appearance URI assigned to the node. The inner value, urn:my-namespace:brushed-metal, is the Custom Material URN that Unreal resolves through CustomMaterialURNResolvers.
appearanceURI = urn:X-l3d:material:urn:my-namespace:brushed-metal
                |-----------------| |-----------------------------|
                appearance prefix  Custom Material URN resolved by Unreal
Experimental
This feature is experimental.
Choose the material path that matches your use case:
Use
appearanceURIwithurn:X-l3d:colorURNs for basic color and opacity assignment.Use MaterialAPI when you want to define material properties such as base color, emissive color, opacity, roughness, or metallic values.
Use the Unreal Material API when you want the
appearanceURIvalue to contain a Custom Material URN that selects a custom Unreal Engine material.
Concepts#
MaterialAPI and Unreal Material API#
In MaterialAPI, a material is identified by MaterialId and defined by its MaterialProperties. A node references that material by assigning urn:X-l3d:material:<MaterialId> to its appearanceURI property.
The Unreal Material API does not create a MaterialAPI material. Instead, it experimentally adds another Unreal-only interpretation for the same urn:X-l3d:material: appearance namespace. In that form, the appearanceURI value starts with urn:X-l3d:material: and then contains a Custom Material URN.
Unreal interprets the value as follows:
A numeric
MaterialIduses the normal MaterialAPI lookup.A valid Custom Material URN inside the
appearanceURIvalue is resolved through the configured resolver binding.An invalid value falls back in the same way as an invalid material id: The 3D data is displayed using the original CAD color and opacity.
Custom Material URNs#
A Custom Material URN is the inner URN that Unreal resolves after reading the appearanceURI value. It follows the regular URN form urn:NID:NSS:
urn:NID:NSS
   |    |
   |    +-- NSS: resolver-specific key
   +------- NID: resolver binding key
The Namespace Identifier (NID) selects the resolver binding on the connector. The Namespace-Specific String (NSS) is then interpreted by that resolver.
A custom NID must follow these rules:
it must be longer than 2 characters
it may contain only letters, digits, and
-it must not start with
l3d,X-l3d,i3d, orx-i3d
What the NSS means depends on the resolver. In UI3DHMapCustomMaterialURNResolver, the NSS is used as a lookup key in a configured material map. In a custom resolver, you define its meaning yourself.
How Custom Material URNs are resolved#
When the instant3Dhub Unreal plugin encounters an Unreal Material API appearanceURI value such as urn:X-l3d:material:urn:my-namespace:brushed-metal, it extracts the inner Custom Material URN urn:my-namespace:brushed-metal. It then uses the NID my-namespace to select the resolver binding and passes the NSS brushed-metal to that resolver. The resolver interprets the NSS and selects the Unreal Engine material to use.
Quickstart#
This quickstart shows the fastest way to resolve a Custom Material URN to custom Unreal Engine materials by using UI3DHMapCustomMaterialURNResolver.
Create a custom material resource map asset#
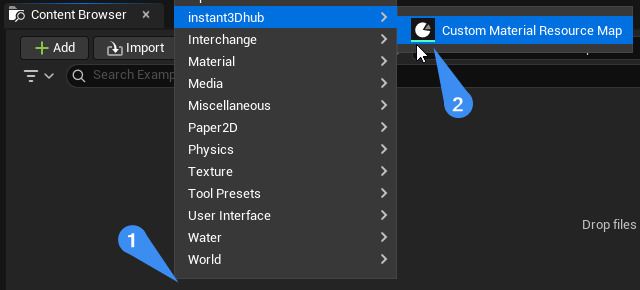
Right-click in the Content Browser to open the asset creation menu.
Choose
instant3Dhub > Custom Material Resource Map.
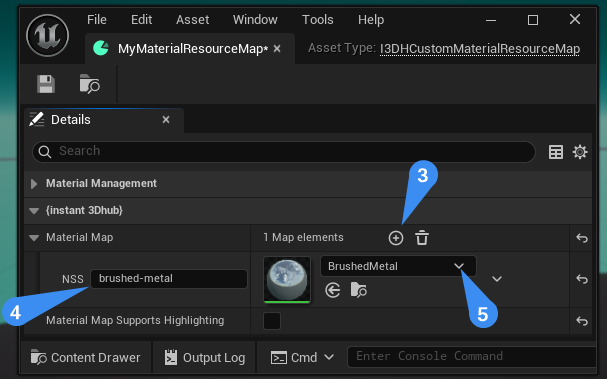
Add a mapping to your Unreal material#
Add a new entry to MaterialMap.
Enter the Namespace-Specific String (NSS), for example
brushed-metal.Select the Unreal material asset that should be used for this NSS.
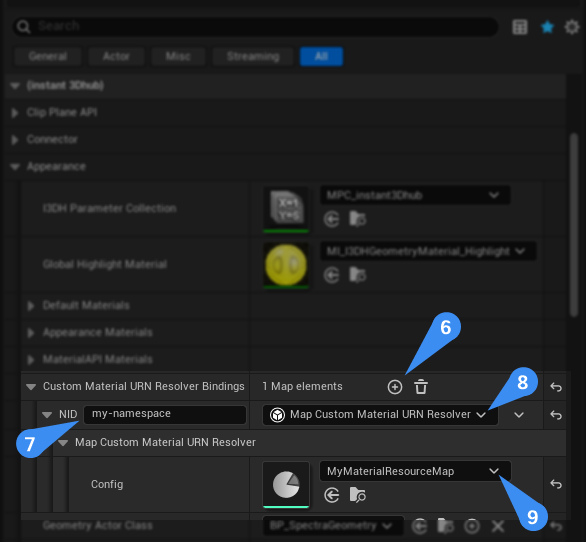
Bind the resolver on the connector#
Add a new entry to CustomMaterialURNResolvers.
Choose a Namespace Identifier (NID), for example
my-namespace.Select UI3DHMapCustomMaterialURNResolver as the resolver type.
Assign the resource map asset you created earlier.
Use the Custom Material URN in your 3D data#
Assign
urn:X-l3d:material:urn:my-namespace:brushed-metalto the node’sappearanceURI. The full value is the appearance URI; the innerurn:my-namespace:brushed-metalis the Custom Material URN resolved by Unreal.Connect to the 3DSpace with your Unreal Engine application.
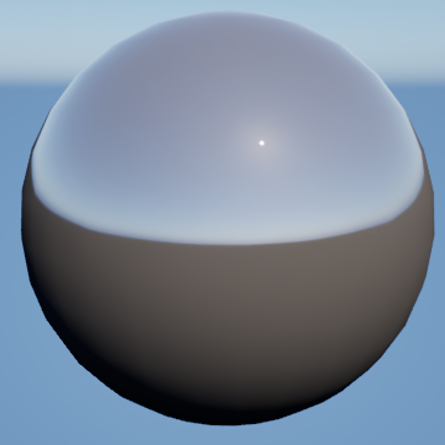
Unreal resolves the inner Custom Material URN by selecting the resolver bound to
my-namespaceand looking upbrushed-metalin the configured material map.In Unreal, the node is rendered with the Unreal Material you assigned. In webvis or other applications without a matching resolver, the node is rendered with the default CAD color and opacity.
Writing your own Custom Material URN resolver#
Use a custom resolver when a static NSS-to-material mapping is not enough.
UI3DHCustomMaterialURNResolver is the C++ extension point for implementing your own resolver logic. The connector binds one resolver object per Namespace Identifier on CustomMaterialURNResolvers.
A custom resolver object keeps its own state, such as soft references, lookup tables, or editor-authored settings. At runtime, ResolveURN receives the NID, the NSS, and an output FI3DHGeometryMaterials struct. Your implementation inspects the NSS, selects the appropriate default and optional highlight materials, and writes them to OutGeometryMaterials.
ResolveURN(NID, NSS, OutGeometryMaterials)
  inspect NSS
  choose default/highlight materials
  write them to OutGeometryMaterials
Return true when the NSS was resolved successfully. Return false when Unreal should fall back to the built-in material handling.
Use the map-based resolver as a reference#
UI3DHMapCustomMaterialURNResolver is a useful reference implementation because it shows the resolver pattern in its simplest form:
the resolver object stores an editor-authored NSS-to-material map
at runtime, it resolves the NSS through a simple lookup
Requirements for your materials#
Your custom materials need to preserve the rendering features expected by the instant3Dhub Unreal plugin. You can always take a look at the built-in materials in the plugin to see how they are implemented:
/instant3Dhub/instant3Dhub/Internal/Materials/M_I3DHGeometryMaterialBase
Support ClipPlanes#
Clip plane support is required. Without it, clip planes will not work correctly with your custom material.
Choose a Material Blend Mode that supports the Opacity or Opacity Mask output:
Prefer
MaskedBlend Mode overTranslucentif possible.
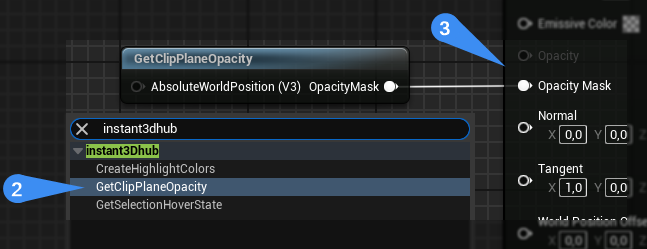
Add the
instant3Dhub > GetClipPlaneOpacityMaterial Function to your material graph.Connect the
OpacityMaskoutput to your material’s Opacity or Opacity Mask.
Support Hover and Selection#
Hover and selection support is optional. If your materials do not react to hover and selection in the material itself, simply leave the highlight material empty in the FI3DHGeometryMaterials returned by ResolveURN.
If you want your custom material to react to hover and selection in the material itself, use the instant3Dhub > GetSelectionHoverState Material Function.
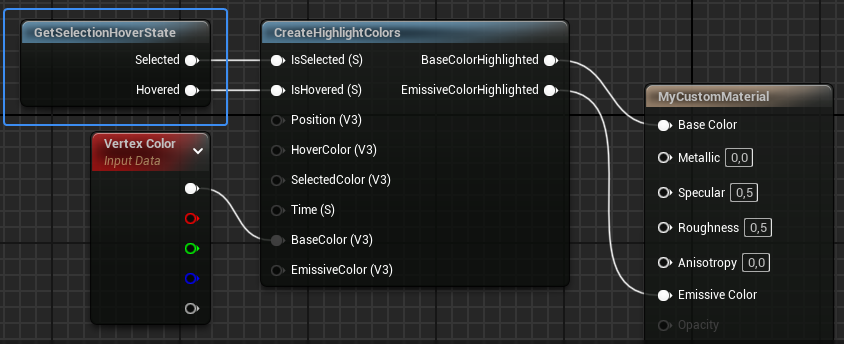
Add the
instant3Dhub > GetSelectionHoverStateMaterial Function to your material graph.The function returns two float outputs for Selected and Hovered that are 0.0 or 1.0.
You can use these values to modify the material’s appearance to your liking or use
instant3Dhub > CreateHighlightColorsto modify your material’s BaseColor and EmissiveColor for highlight similar to the built-in materials.
Two-sided Materials#
CAD geometry surfaces are not always oriented consistently. A single model can contain triangles whose front faces point in different directions, so custom materials should usually render both front and back faces.
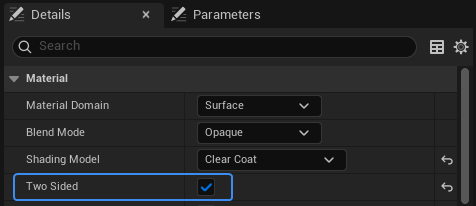
Check “Two Sided” option in the Details panel#
Enable Two Sided on your material when the material domain exposes this option. Some material domains do not support the setting; those domains are already rendered two-sided by nature, so no change is needed.
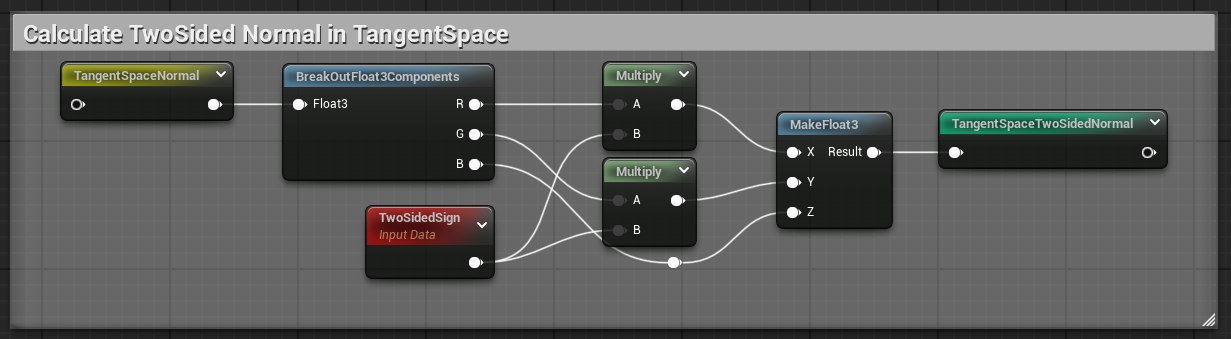
Convert a tangent space normal to a two-sided tangent space normal#
If your material uses a tangent-space normal, convert it before connecting it to the material’s Normal input. This makes the material look identical on front faces and back faces.
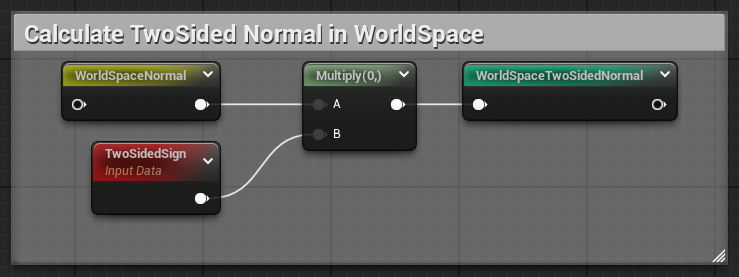
Convert a world space normal to a two-sided world space normal#
If your material uses a world-space normal, use the world-space conversion instead.
Limitations#
Opacity and culling strategy#
Opacity defined in Unreal Engine materials is unknown to the Remote culling strategy. The remote culling strategy continues to use the original CAD opacity. Any opacity defined in the Unreal material will be ignored in the remote culling process, meaning that a mismatch of opacity leads to inconsistent culling of geometry.
Therefore the Unreal Material API is only compatible when used with Local culling strategy. See Culling strategy.
Clients without a matching resolver#
The MaterialAPI material reference is shared through the 3DSpace, but resolving a Custom Material URN to an Unreal Engine material only works in Unreal applications that have a matching resolver configured.
In webvis, or in Unreal applications without a matching resolver, rendering falls back to default CAD color and opacity.
Performance notes#
Built-in appearance handling is cheaper than most custom Unreal Engine materials.
Advanced shading can improve the visual result, but it may also increase rendering cost.
instant3Dhub 3D data often puts significant pressure on the vertex stage. If performance is critical, avoid expensive vertex-stage material work where possible.
Be careful with opacity. We strongly recommend masked opacity instead of translucency whenever possible.
General Unreal Engine material optimization guidance still applies: